
Sheet Metal Lamp
I made this lamp for a manufacturing class; our first project was to make a sheet metal lamp. I greatly enjoy working with sheetmetal, so I incorporated many aspects of sheet metal work (including bending, riveting, and spot welding) into my design.
Step 1: Ideation and Design
The first step in the lamp project was coming up with a vision for what I wanted to make. I thought that incorporating patterned sheet metal into my design might give it visual appeal and a starting point for other ideas. I took a trip to Home Depot and found this sheet metal to use for my lampshade. Based on the pattern of the sheet metal, I wanted the body of my lamp to have a geometric pattern, and the hexagon chassis came to life.
Once the general structure of the lamp was ideated, I created an Onshape model to build upon the design and generate DXF's to start the prototyping process.


Home Depot sheet metal for the lampshade

Step 2: Prototyping and Testing
After developing a preliminary design, I waterjet some sample hexagons for bending and testing. I was quite satisfied with the visual result and found that they bent and assembled very well. Given the ease of assembly, I decided to size down the hexagons to help meet constraints of limited metal quantity and the 12" x 12" waterjet bed.
On the left is the test chassis. On the right is the testing to asses how the four hexagons bend together to form a closed shape. Becuase the testing was done with aluminum and not steel, all the prototypes are held together with clamps rather than spot welded.


Step 3: Fabrication
With the exception of the lampshade, all pieces of my lamp were waterjet. I started with the hexagon chassis, cutting all the profiles and making the bends on a sheet metal brake. The sides of each hexagon needed to be bent to a 45 degree angle for proper assembly. Once the pieces had been bent, I tested that they fit together and clamped them into place. Each row of hexagons was then spot welded to the adjacent row at the overlapping joints. This process and the final chassis result can be seen on the left. I was particularly satisfied with the results of the heat treatment on the steel.
Challenges: Mounting a Bearing
Midway through the design process, I had the idea to make the lamp shade spin so that the patterns in the lamp shade could cast moving shadows on a wall. This gave me a new challenge of mounting a bearing into sheet metal. After ideating with people at my job in the makerspace, I decided to create tabs for a bearing to be press fit into. After press fitting into the tabs, I added a cap and bent the excess material inwards to prevent motion in either direction. The bearing mount had flanges that attached to the chassis, and a bolt went through the bearing to attach to the spiderweb-like component that held the shade. A delrin washer sat between the bearing mount and the spiderweb component to reduce friction and prevent interference with the tops of the M3 bolts.
Bearing Mount top view
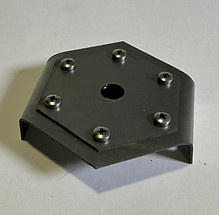
Bearing Mount bottom view


Final Results!
I was extremely happy with how my lamp came out! The success of the bearing mount resulted in a very clean spin, and aesthetically all of the components came out how I had hoped. The construction and bending all went according to plan, in large part thanks to my sheetmetal experience in the past (see Sheetmetal Staircase). The main issues in the final design were a slight wobble in the base hexagon, and the lampshade not being perfectly cylindrical due to the flimsiness of the sheet metal. To counteract the wobble in the base, I added some rubber feet to the bottom, which also aided in grip and allowed for the shade to be spun faster.