CNC Furniture
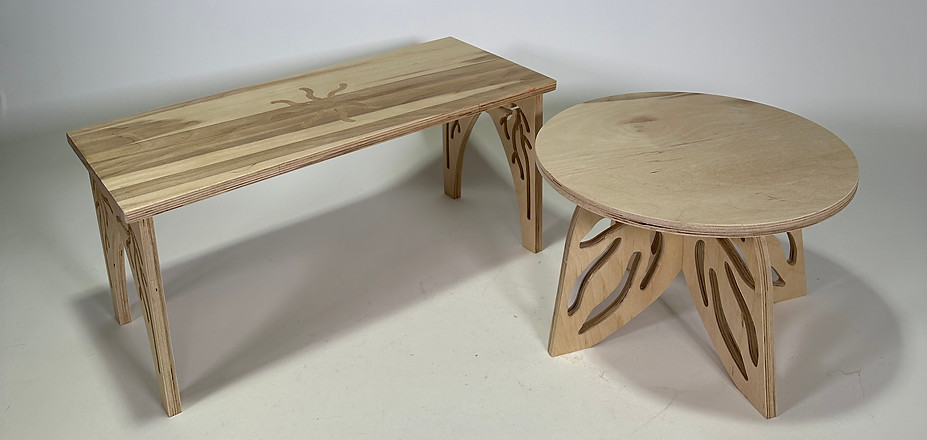
This was a class project to introduce us to the CNC. I worked with a partner and we made two plant stands so that we could each take one home. We wanted to create something with no fasteners that had an organic look to it. We chose to make a pair of plant stands because this fit with our theme and we were each able to keep a part of the project. After finding some inspiration on social media, we decided to do an inlay on the top of our table. The leaf stool was also inspired through online findings. My partner and I were very happy with how the design turned out especially because of the pattern on the plywood for the sun table. We had slight problems with the joints tolerance but were able to troubleshoot this effectively.
Leaf Table Design
The leaf table was inspired by a design seen online when we were looking for CNC furniture inspiration. My partner worked on the leaves and I designed the joints. The table was made on a CNC using a 1/4" bit, which was accounted for in the design of the leaves and the joints. Once the pieces were cut the leaves were hammered in to the top of the table. We did some sanding and added a coat of polyurethane to the table to improve the feel and resistance to wear. This table meets design for manufacturing principles because it required minimal post processing typical of CNC wood projects. The table is able to be efficiently shipped as flatpack furniture with only a hammer needed for assembly. The leaf took 50 total minutes on the CNC and would cost about $46 for material and CNC time.

Leaf table isometric view

Leaf table Onshape rendering
.png)
Sun table Onshape rendering

Sun table inlay
Sun Inlay
During the design of this project, I came across a video of a cutting board inlay using a CNC. This inspired us to incorporate an inlay into our design. My partner had some red oak that we thought would contrast nicely with the plywood and had a visible grain pattern that we liked. We added wood glue and hammered the pieces in, then sawed off the excess and sanded the surface smooth. This part of the project does not meet DFM principles because it required dry time for the wood glue and extra post processing steps that would not be desirable for mass manufacturing.
Design for CNC - Roots
One of the largest challenges of this project was designing around the capabilities of the CNC without needing to switch to a smaller bit. My partner worked around this in her root design by offsetting a spline by 1/8" on either side to get a visual of the result. The exported file was the lines for the CNC to cut on and the profile of the legs for the bit to go around. The legs of the table took about 20 minutes each on the CNC and would cost about $46 for material and CNC time.
Design for CNC - Joints
In my joint design, I incorporated relief holes to maintain the right angles of the finger joints. We did a lot of testing to make sure that the tolerance of the fingers fit nicely into our slots. Even with testing, we found that our leaf tolerance was a bit tighter than anticipated, and so we sized up slightly for the sun table. The scale that we sized up by did not go according to plan, and the joints on our sun table were loose when we originally put them in. To solve this, I laser cut small strips of birch wood and wedged them into the joint. For both tables, my partner and I were careful to hammer the joints in evenly to ensure the tables did not have wobble to them. The top of the sun table had a slight warp in it, so my partner ended up sanding the feet down until it was perfectly level.

Sun table root legs
.png)
Final test joint
Reflection and Teamwork
My partner and I were both very pleased with the final result of our project. Excluding the inlay, we think our project adhered to DFM principles. I think the most frustrating part for both of us was testing the joints, but in the end we were grateful that we did. My partner and I had both never CNC'd before so it was an interesting challenge to learn how to use the software and design around the size of the bit that we were using. We did the design on our own time but most of the operating of the CNC together, which I think worked well for us both. We had intended to put an ogee routed edge on the tabletops, but forgot about this until after the legs had been pressed in. If we could do it again, hopefully we would have remembered that step.
My partner worked on the aesthetic design of the tables, and I worked on the joints. I would estimate that we spent a combined 10-12 hours working on the CAD model, including edits made to the joints during testing. We spent 5-6 hours using the CNC for testing and manufacturing and 2 hours assembling the project. We spent about 20 minutes repairing a split in the leaf tabletop caused by the CNC tabs and didn't need to do any redesign outside of our testing. Altogether I spent about 10 hours working on this project, and my partner spent about 14 hours. Including labor ($85/hr), CNC time ($30/hr), and materials our tables would have cost around $2100 as a set.